Better-Than-Cake Cornbread!
I think sometimes we get stuck in cooking ruts… I know I do.
Take cornbread, for example. I had long ago firmly decided that I like savory cornbread, not sweet. And that I like my savory cornbread to have an extremely crispy bottom crust (practically fried from the cast iron skillet.) And that was that.
And just when I’m sure there simply isn’t any other type of cornbread worth sniffing at… THIS little beauty pops up on my front porch and rocks my cornbread world.

~
As I sat at my kitchen table wolfing down piece after piece, a thousand questions raced through my mind.
“Is this cornbread or CAKE?”
“What witchcraft is making this cornbread so SOFT??? I feel like I’m eating a pillow.”
“It has broccoli in it… so why do I feel like I’m eating dessert!”
“Is this really my fourth helping?”
And so on and so forth…

~
And to think all these years I’ve stayed in my crispy/savory cornbread rut and missed out on the glorious-ness that is sweet, broccoli & cheese-filled, buttery, Devil’s food tender cornbread. As the young people say these days… #smh.
Anyway, I have Sherri Garner and her lovely daughter Kyndall to thank for introducing this cornbread into my life. Kyndall sweetly volunteered to bring a meal by our house tonight, as I am recovering from surgery. (My third this year. Ick!) And that is one of the things I SO love about food… that we can use the gift of cooking as a gift to bless others!
I’m thrilled that the Garner ladies have agreed to let me share this recipe with all of you. 🙂 Now we can all bake it for people we love and they can marvel at our ability to make something as simple as cornbread so irresistible!
In closing, make this cornbread. Now.
XOXO
Sherri Garner’s Broccoli Cheese Cornbread
Featured On: The Pretty/Hungry Blog
Serves: 12
–2 boxes Jiffy cornbread mix
–1 10oz pkg of frozen chopped broccoli (cooked & drained)
–1 C cottage cheese
–1 1/2 sticks melted butter
–1/2 cup diced onions
–4 eggs beaten
–1/2 C mozzarella cheese
Grease a 13×9 inch baking dish. In a large mixing bowl, mix all ingredients together. Bake at 350 for 35 minutes.
.
.
.
You might also enjoy…
Carissa’s Homestyle Biscuits 7 Holiday Must-Makes!


Healthy Brownie in a Mug!
Have you noticed this “Desserts in a Mug” craze going around the internet??
I have to admit, when I first noticed single-serving desserts popping up on my Pinterest feed, I was uber skeptical. Up til then, I had managed (through sheer laziness!) to avoid giving in to my late-night sweets cravings, simply because giving in would’ve meant getting up off my lazy butt to make a whole pan of brownies, cookies, or cake. Ain’t nobody got time for that! But now you’re telling me I can make a personal-pan brownie in a matter of minutes, anytime the urge strikes??? “This is not good,” I thought. “I need to stay far away from these,” I thought.
But here’s the thing… single-serving desserts are kiiiinda winning me over! Oops.

Yes, on the one hand they make brownies that much more accessible (and that can be dangerous.) But on the other hand… there are ways to make single-serving desserts healthier! AND if you’re still below your calorie goal at the end of the day, can’t we call it good?
Yes! We can! Of course I’m not advocating a steady diet of sweets that is devoid of necessary protein, vitamins, and antioxidants… but I do think that occasional treats are ok if they fall within your daily calorie recommendations. Yes, even during Super-Healthy-October! 🙂
Especially when you take the time to make your sweet indulgences a little healthier by using whole grains, healthy fats, and naturally low-calorie sweeteners. Like my scrumptious brownie in a mug!
 ~
~
This baby is healthy yet heavenly. Decadent yet oh-so-sensible. And while my recipe calls for a touch of milk… you can easily trade that out if you want and make it totally vegan! (Whaaaat?!?) And for only 280 calories, you should have no problem budgeting it into your day (calorie-wise.) 🙂
I highly recommend embracing dessert and making room for it in your healthy lifestyle. It makes you a much happier person!
Here’s how ya make it…
~
Healthy Brownie in a Mug (Only 280 calories!)
(Source: Pretty/Hungry Blog)
Serves- 1
Prep Time- 5 minutes!
~
*Lightly spray your favorite mug with cooking spray. Set mug aside and use a measuring cup to mix ingredients. Start by combining the following dry ingredients:
-2 Tbsp. oat flour
-1 Tbsp. whole wheat flour
-1 Tbsp. brown sugar (or Sucanat, which is just evaporated cane crystals)
-pinch of salt
-4 tsp. cocoa powder
-scant 1/8 tsp. baking soda
-1/8 (slightly heaping) tsp. Stevia powder
*Once these have been stirred together with a fork, begin adding in the wet ingredients.
-1 1/2 Tbsp. applesauce
-3/4 Tbsp. coconut oil (or canola oil)
-2 tsp. pure maple syrup
-1/8 tsp. vanilla extract
-4 tsp. milk of choice
-1 tsp. mini chocolate chips (Or other favorite chips… I like peanut butter chips!)
*Stir with a fork to combine, then use a rubber spatula to scrape batter into prepared mug. Cook in the microwave on High for exactly 1 minute 15 seconds. And then voila! Party time. 🙂
.
.
.
You might also enjoy…
Healthy Chocolate Pie Coffee!!


Be “Extra Good” to Your Body in October!
Over the years, October has become my unofficial “Be Extra Good To My Body” month. And I’d like to invite you to join me in making October “extra good” for you too!

The gist of this undertaking is as follows:
We all know that as hard as we try to maintain our healthy lifestyle, our ideal body weight, our workout regimen, and our “everything in moderation” mentality through the two landmine-filled Holiday months of November & December… it is dang near impossible!
Halloween kicks off the food-fest with a bowl of Reese’s cups that sits around your house tempting you for at least the 1st week of November. Then your office has a Thanksgiving potluck… oh and your church, and your ladies’ bible study, and your book club. Then Thanksgiving Day itself arrives (and the leftovers linger long afterward.) And then before you know it, it’s December and the Christmas parties are coming at ya every weekend! And sweet little neighbor ladies are delivering trays of fudge and sugar cookies to your doorstep. And Pinterest becomes a tidal wave of cinnamon rolls, peanut brittle, and chocolate cheesecake. And your boss gives you a ham as a Christmas Bonus! And everywhere you look there is pie, hot chocolate, and lil’ smokies! AHHHH!!!!

Ok, so that is a dramatization… but it comes directly from my REAL-LIFE experience, and I can only assume you encounter similarly gale-force temptations during the Holidays.
Now do hear me say, I am NOT advocating any kind of crash diet before the Holidays begin (or any time of year, for that matter.) But I have found that for me, the Holidays are far more enjoyable when I start them off in the best shape possible. I feel better, I have more energy, I avoid the flu, and (perhaps most importantly) I have little to no guilt about consuming a few fun Holiday treats because I’ve worked hard to earn them! What I’m suggesting then, is that if you (like me) are generally disciplined when it comes to your diet but anticipate the Holidays will be extra challenging and not altogether “slimming”, commit yourself to using the month of October to be extra good to your body in preparation for the coming indulgence.
*Side Note (If you have diabetes, heart disease, or have for any other reason been told by a medical professional that your weight is dangerously high, then I do NOT recommend “being good” in October so you can slack during the Holidays. In fact, I encourage you to employ the phrase “Get Behind Me, Satan!” as often as possible during the coming holiday season. The planned indulgence I’m referring to above is not advisable if your health is in jeopardy.)
~
So here are a few of the things I do to be “extra good” to my body during the month of October. I’d love it if you’d shout out your favorite healthy tips in the comments section too. Share the love! And let’s do this. 🙂
1) I start off my day with a vitamin-packed green smoothie!
2) I limit my fat intake to the healthy fats (like olive oil, avocado, coconut oil, raw nuts, & flaxseed)
3) I keep my daily calorie intake below 2,000. (The proper number will look different for everyone. See what your ideal caloric intake is here!)
4) I guzzle water like it’s going outta style!
5) I try (key word: TRY) to be done eating at least 2-3 hours before I go to bed. If you are like me and cutting out late-night munchies is a non-option, here’s a great list of healthy late-night snacks!
6) I try (again: TRY) to get more sleep. At least 8 hours a night is so deliciously good for your body!
7) I attempt to include veggies in every meal. And I cook at home so that I know what’s going into our meals. (Restaurants are NOT stingy with the butter and salt, in case you didn’t know that.) But the good news is, you can hide vegetables in so many things!
.
.
.
You might also enjoy…

Source: Harvard School of Public Health
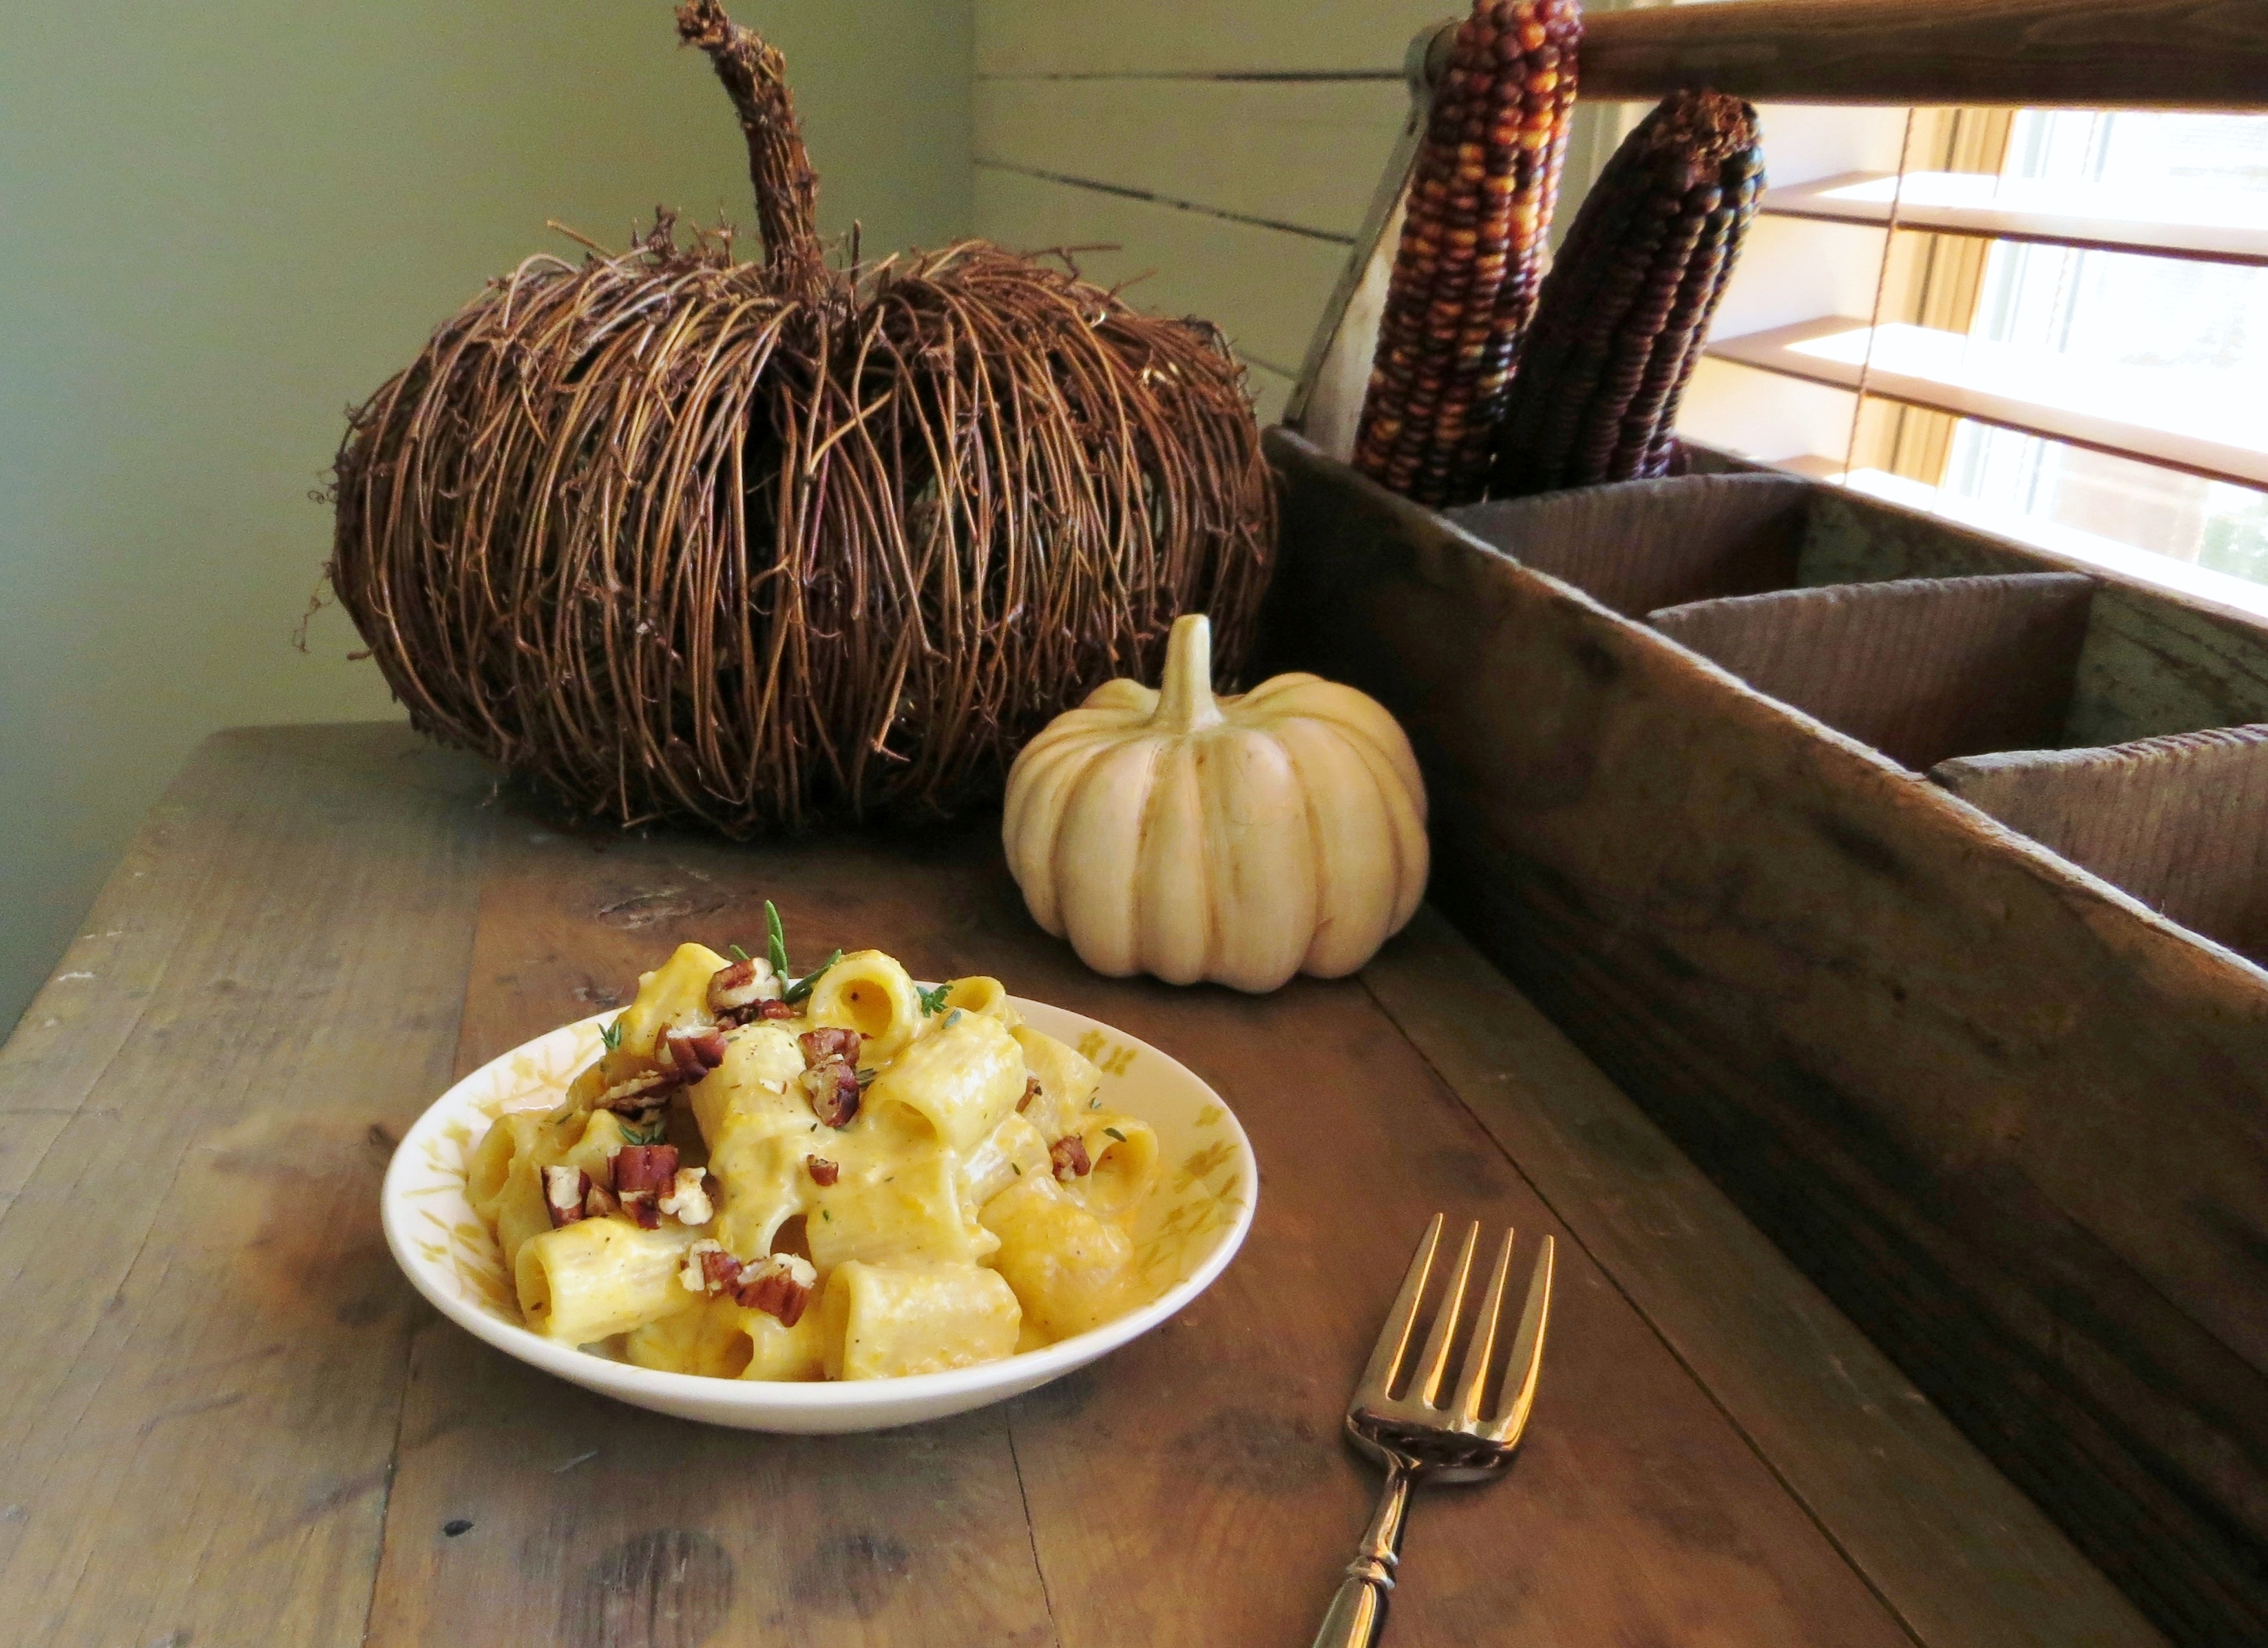
Rigatoni with Cheeeesy Pumpkin Sauce
I’m such a rebel, man! (Ok, not really :P.) But when it comes to cooking with pumpkin, I kinda am. I’m always hunting for ways to eat it that stray from the “traditional” sweet breads, pies, and other cinnamon-y concoctions out there. I don’t know why either, because those things are seriously delicious! I really do think it’s some internal rebellious desire inside me that just wants to stick it to the man and go my own way. I was pretty calm as a teenager so maybe this is me “acting out” to compensate as an adult.

Anyway, this week I whipped up a quick pumpkin pasta dish that was HEAVEN. By the way, do you regularly use rigatoni pasta noodles? Because you NEED to. They hold so much more sauce than your basic spaghetti and linguini noodles! It is probably my favorite type pasta of them all!
 ~
~
This dish is meatless, but I have also made it with the addition of chopped rotisserie chicken and it is truly wonderful either way. And those toasted pecans on the top? Dang. That’s all I can say. They add the most perfect, toasty/sweet crunch. DO NOT leave them off, do you hear me? (Of course I’ll never know… so do what you want. But add the pecans. Do it.)
My husband loooooves this pasta. He keeps asking me when we’ll be having it again… when I can make it for his parents because “They would really like it” etc, so I’d say it’s a clear winner.
~
I went ahead and took process photos of this pasta because the steps might not be familiar to everyone. Just know in advance that I’m aware of how horribly disgusting my stove top is in these photoes and have no excuses to offer. My kitchen gets dirty and sometimes I don’t clean it before I cook something new. I hope we can remain friends.
Start by finely dicing the onion & garlic and sauteing them in a little oil, butter, or even reserved fat from cooking another meal. (I love to save the fat from breakfast sausage to cook with. Yum!) Sprinkle in the herbs, along with a few pinches of salt and pepper and cook over medium heat about 5 minutes until onions are soft. Sprinkle 1/8 Cup of flour evenly over the mixture and stir it around for about 1 minute to allow the flour to cook. Then pour in 1/2 C. chicken broth and 1/2 C. cream (or half & half).
 ~
~
Stir in the broth and cream and allow it all to bubble gently for 3-5 minutes, until it has thickened into a nice sauce. It will look like this when you drag your spatula along the bottom of the pan (thick enough to take a few seconds to cover the empty spot.)
 ~
~
Now, add in the pumpkin puree, and all the delicious cheeses (cream cheese, Parmesan cheese, and sharp cheddar. Goat cheese would also be a delicious substitute for cream cheese if you wanted to go that route.) Stir over low heat to melt.
 ~
~
Meanwhile, you’ve had your noodles boiling in salted water for about 9 minutes. (Sorry, forgot to mention that before, but I’ll be sure to in the printable.) Before draining them, reserve 1/4 Cup of the starchy pasta water to add to the sauce later.
 ~
~
Then just drain the noodles and dump them directly into the saucepan.
 ~
~
Toss to coat all the noodles in the heavenly sauce. (It is at this point you could add chopped chicken if you so desire.)
Garnish with fresh thyme and a dusting of toasted, chopped pecans. (I toast my pecans quickly in a dry skillet on the stove top. It really makes them crunchier and sweeter so try not to skip that step.)
 ~
~
Ooooohhhh man, I wish I could come to your house and make this for you right now. Just to show you how worth it it is! This is one pumpkin recipe to hang onto. And as a nice bonus, it can be prepared in under 30 minutes, so it’s a great weeknight meal for when you’re short on time.
Can’t wait to hear how you like it! I love me some savory pumpkin!
~
Here’s the printable recipe:
Rigatoni with Cheesy Pumpkin Sauce
Source: Carissa @ Pretty/Hungry Blog
Feeds: 4
Ingredients:
-1 tbsp. desired fat (oil, butter, or reserved cooking fat from another meal)
-1/4 onion, finely diced
-1 clove garlic, minced
-sage, thyme, & rosemary (1/2 tsp of each if using fresh, 1/4 tsp of each if using dried)
-salt & pepper, to taste
-1/2 Cup low-sodium chicken broth
-1/2 Cup half & half cream
-1/2 Cup pumpkin puree (to make your own, see here!)
-2 Tbsp. cream cheese
-2 Tbsp. grated Parmesan cheese
-1/4 Cup grated sharp Cheddar
-1/4 Cup toasted, chopped pecans (toast over medium heat in a dry skillet, stirring frequently for 1-2 minutes)
-fresh thyme for garnish (optional)
-chopped, pre-cooked rotisserie chicken optional)
Directions:
In a small, dry skillet, toast 1/4 Cup pecans over medium/low heat, stirring frequently for 1-2 minutes until you begin to smell a nutty aroma. Transfer to a cutting board and coarsely chop. Set aside.
In a separate medium skillet, melt desired cooking fat and saute diced onion & garlic over medium heat, along with herbs and a pinch each of salt & pepper.
Meanwhile, bring a pot of salted water to a boil and add in 6-8 oz rigatoni pasta. Set a timer according to package instructions for al dente pasta.
When onions are soft (after about 5 minutes), sprinkle 1/8 Cup flour evenly over them and stir to distribute. Allow to cook about 1 minute. Pour in 1/2 Cup chicken broth and 1/2 Cup half & half cream. Let bubble gently to thicken (about 3-5 minutes) until sauce coats the back of a spoon. Then reduce heat to low and mix in 1/2 Cup pumpkin puree, 2 Tbsp. cream cheese, 2 Tbsp. Parmesan cheese, 1/4 Cup sharp cheddar, 1/2 tsp salt, and 1/2 tsp pepper. Stir to gently melt cheeses.
Reserve 1/4 Cup pasta water before draining noodles. Then add drained noodles directly to the sauce pan and toss to combine. (Add 1 Cup chopped, pre-cooked chicken at this stage, if desired.)
Garnish with toasted, chopped pecans, and fresh thyme.
.
.
.
You might also enjoy…
Pumpkin Lasagna Spaghetti Squash with Pesto & Parmesan


Carissa’s Homestyle Biscuits
I am a big fan of weekend breakfasts. Throughout the week, we are cereal & oatmeal people. But weekends are when we pull out the big guns! Bread Pudding, Breakfast Pizza, and my husband’s personal favorite, Biscuits & Sausage Gravy. Of course, we can’t eat this way all the time… but special occasions come around often enough to keep us happy. 🙂
This week I whipped up a big batch of biscuits for the freezer! You’ll have to pardon the fact that there is no photo of a “finished” biscuit. These were made to be frozen (which is a great thing to do when you have a little extra time. Make a double-batch of biscuits and then you can pull out the exact number you need anytime!)
 ~
~
I also have a handy little trick that saves me lots of time. I’m extremely impatient when it comes to “cutting” butter into flour for things like biscuits and pie crust… I don’t like doing it. So I suggest putting your butter into the freezer half an hour before you make the biscuits, and grating it into your mixing bowl! SO much easier. And quicker!
Here is my recipe. Enjoy!! It makes a lot (about 24-30) so you might want to cut it in half.
~
Carissa’s Homestyle Biscuits
-3 1/2 Cups all purpose flour + 1/2 Cup whole wheat flour (plus extra for dusting)
-2 Tbsp baking powder
-3 tsp. salt
-3 sticks butter, pre-frozen for about 30 minutes
-1 Cup cold whole milk, mixed with 1 T. lemon juice
-2 large eggs
Preheat oven to 425. In a large mixing bowl, stir the flour, baking powder, and salt to combine. Grate in the frozen butter using a cheese grater. (After grating in each stick, toss into the flour to distribute.) In a separate bowl or large measuring cup, lightly beat the eggs. Stir in the lemon/milk mixture. Gradually pour the milk/lemon mixture into the flour mixture, stirring with a fork to form a wet dough.
On a lightly floured work surface, turn dough out and use your hands to form it into a thick disc. Use a floured rolling pin to roll it to about a 1″ thickness. (At this stage, I like to fold the dough over itself once, then twice, and roll it again to 1″ thickness. I find this gives the biscuits nice “flaky layers.” But this step is not necessary.) Use a glass or biscuit cutter to cut out 24-30 biscuits.
If freezing, place on a large baking sheet lined with wax paper and dusted with flour (spaced apart so they don’t freeze together.) Place baking sheet in the freezer for at least 2 hours. Then transfer biscuits from baking sheet to a large zip-top bag, and store in the freezer until needed.
OR if baking immediately, place biscuits on a baking sheet (brush with eggwash, if desired, for a browner top) and bake 20-25 minutes, until golden brown. Serve with butter and jelly, or sausage gravy. (Sausage gravy recipe can be found here.)
*Note: It is not necessary to totally thaw your frozen biscuits before baking, but I do recommend at least partially thawing them (30 minutes or so at room temp) before baking.
.
.
.
You may also enjoy…

Buffalo Chicken Quesadillas, OH my!
Do you know what my most FAVORITE category on this blog is? Not dessert, not bread (though I love both those things)… but Budget! The thrill I get a from a good deal is unmatched. 🙂 So today, I’m sharing with you a meal idea that is not only extremely budget-friendly, but a big-time crowd-pleaser. (And sometimes, my recipes are kinda… different… so I’m excited about this one because I know it’ll be a hit no matter who you make it for.)

~
So let me share a little secret with you about my grocery budget.
Shhh… here it is. I only buy one meat item per week!
(Ok, two if you count breakfast meat, since I try to have sausage or turkey bacon on hand for my girl’s breakfasts, and for “Brinner”). But other than that… my general practice is to pick what’s on sale that week (maybe it’s bone-in chicken, maybe it’s ground beef, maybe it’s chuck roast, maybe it’s pork chops) and make it stretch into at least 3-4 meals for my family of 3. The other 3-4 meals of the week are either meatless or low-meat (incorporating eggs, beans, pepperoni, bacon, etc.) I would say I aim to spend $5 per week on my main meat item, and under $2 for a secondary meat item like sausage or bacon. Believe it! We do it, and we eat well around here!
Now, I don’t share any of this to imply that you should be doing the same. Just sharing what works very well for us! By limiting my meat purchases this way, I save SO much money and I can use it for other weekly necessities.
Some of you like to stock up on meat when the prices are low, and that is wonderful! But if you are not someone who can afford a large meat purchase all at once, this is another great method to try.
And despite what you might think, I don’t find it boring at all to use the same “type” of meat throughout a given week. In fact, I find it sparks my creativity, coming up with different flavor combos and meal ideas for one type of meat. Click here for an example of how I recently used one roast beef for three different meals!
~
This week, I had a coupon for a Rotisserie Chicken, which dropped the price down to exactly $5. Yay! This was a major score because I love not having to cook the meat before using it!
I’ve learned over time that my baby does not care for chicken breasts because the meat is drier and harder for her to eat. So when I buy a rotisserie chicken, I reserve a few thighs or legs for Elsa’s lunches throughout the week, and use the breast meat for family dinners. I also make sure to keep the bones and the flavorful, herb-encrusted skin, for making broth.
And this breast meat is what I used to make our dinner tonight, which happened to be these amaaaazingly addictive Buffalo Chicken Quesadillas. I spotted them originally on Chocolatemoosey.com, and adapted them a bit to fit our family’s tastes.

~
Start by carving off one of the chicken breasts from a grocery store pre-cooked rotisserie chicken. (Or whatever chicken you have on hand. Even canned will work!)

~
Chop it up into nice little shreds, and gather up the rest of the ingredients.

~

Onion, Garlic, Bell Pepper, Hot Sauce, Ranch Dressing, Cream Cheese, Cheddar Cheese, & Tortillas. (Note that I was a little low on Ranch Dressing… all I had was a leftover packet from Zaxby’s, so I supplemented with some mayo. Ain’t no thang!)
~
Finely chop the onion, garlic, and bell pepper, and saute them in any fat you desire (oil, butter, leftover bacon grease) until soft.

~
Add in the chicken, the ranch, and the hot sauce.

~
Stir over medium heat until the mixture is well combined. Then add in the cream cheese and cheddar and stir gently until they are melted and completely incorporated.

~
Next, just spray a clean skillet with cooking spray, place a tortilla inside, and spoon a generous amount of Buffalo Chicken Dip onto it. Spread it out almost to the edges.

~
Cover the dip with another tortilla and spray it with cooking spray as well. Allow the tortilla to gently crisp up over medium heat for a few minutes, then use a large turner to flip the quesadilla in the pan!

~
It doesn’t get much easier than quesadillas, folks! And it definitely doesn’t get much more delicious!
Cut each quesadilla into 6-8 triangles, and serve.

~
I will say that these babies are NOT low-calorie, so to go along with them I like to serve a delicious (and also budget-friendly) Green Smoothie!
Hang on, hang on… don’t knock it til you’ve heard me out! My green smoothie recipe is such a nice pairing to this spicy Southwest-flavored dinner! It combines lots of tropical flavors like lime, coconut, and banana… and is just the perfect creamy compliment to a spicy meal. Plus, it gives you a much-needed serving of veggies alongside this calorie-laden quesadilla. I can’t sell it strongly enough. Hop on the bandwagon and become a green smoothie drinker! (And they’re not just for breakfast, as today’s recipe clearly demonstrates.)
Avengers Cup Optional… It’s just how we roll in my household.
I know you will gobble these quesadillas up! Be sure to tell me all about it in the comments and share the Buffalo Chicken love with the world. 😉
~
Here’s the recipe:
Buffalo Chicken Quesadillas
Serves: 2
Ingredients
-1 T. oil, butter, or reserved fat from cooking
-1/2 onion, finely chopped
-1 garlic clove, minced
-1/4 C. bell pepper, finely chopped
-1 pre-cooked chicken breast, diced
-1/4 C. Sriracha (or other favorite hot sauce)
-1/4 C. Ranch Dressing
-4 oz. cream cheese
-1/2 C. sharp cheddar, grated
-4 flour tortillas
Directions
Saute onion, garlic, and bell pepper in oil until soft (about 5 minutes.) Add in chicken, hot sauce, and ranch dressing. Cook and stir 1 minute. Add in cream cheese and cheddar cheese and stir to melt. Remove from heat. In a clean skillet, spray with cooking spray and place one tortilla inside. Spoon half the buffalo chicken dip onto the tortilla and top with another tortilla. Spray the top tortilla with cooking spray as well. Allow tortilla to crisp over medium heat for a few minutes, then flip to other side. Cut into 6-8 triangles and serve alongside Tropical Green Smoothies!
.
.
.
You might also enjoy…
Game Day Green Goddess Dressing Rosemary Skewers


My “Tropical” Green Monster Smoothie
Have you jumped on the green smoothie bandwagon yet?
I’m decidedly un-trendy on most fronts, but this is one trend I have definitely gotten behind! The Green Monster movement is really nothing more than adding a handful of healthy greens to a blender with a few sweeter ingredients, to make it more appetizing! Sometimes I just don’t feel like steaming up a bowl of broccoli, you know? (Don’t feel like steaming it AND don’t feel like eating it.) Enter, the green smoothie. 🙂 Perfect any time of day for a meal or a snack. (And much more delicious than a nasty V8, I might add.)

The Avengers cup is totally optional. That’s just how we roll in my household!
There are a million recipes out there that you can try. For mine, I always make sure to throw in these three musts:
-a handful of frozen spinach (much more budget-friendly than fresh, and just as healthy!)
-a few scoops of yogurt (for healthy probiotics and a creamy texture)
-frozen banana (for potassium and to give it that perfect consistency that is almost like ice cream!)
Beyond that, anything goes! I sometimes throw in lemon juice, or coconut oil, or ground flax seed, sometimes peanut butter, sometimes frozen berries. Basically whatever I have that sounds good! I love adding avocado too. It makes it so silky!
Here’s the recipe for my “Tropical” Green Smoothie. It pairs amazingly well with Buffalo Chicken Quesadillas. The cool, creamy drink calms the palate from the spicy buffalo chicken, and gives you a much-needed serving of vegetables to go along with the slightly-less-healthy quesadillas. (Ok, a LOT less healthy. Ha!)
~
Carissa’s “Tropical” Green Monster Smoothie (For 2)
-1 frozen banana (cut into chunks prior to freezing)
-1/2 C coconut yogurt (vanilla is okay too, but coconut is much better!)
-1/2 C. milk of choice (almond and soy work as well as dairy.)
-2/3 C. frozen chopped spinach
-2-3 T. lime juice
-1/8 tsp Stevia (or 2 T. honey)
Blend on high until spinach is well broken down and smoothie texture is very smooth. 🙂 Scrape down sides with a rubber spatula and pulse a few more times just to be sure. Pour into two glasses and serve!
.
.
.
You might also enjoy…
Adding “Secret Vegetables” to Chili

Something Special For the Holidays…
I have something suuuuper exciting to share with you today!
I have been a busy little bee working on a special Pretty/Hungry project to roll out for the holidays… and today I can finally give you a sneak peek.

A Pretty/Hungry Year- 2014 Wall Calendar Featuring Recipes & Photos by Carissa Casey: Author of the Pretty/Hungry Blog
This calendar is a special collection of some of my favorite Pretty/Hungry recipes, hand-selected and photographed by yours truly. 🙂 Each month features a scrumptious seasonal dish and full color photo. I like to think of this as a mini-cookbook of sorts, with the fun added function of being a calendar! Two wonderfully useful items in one!
~
I happen to love calendars, because I’m a bit of a planning nut (in case you didn’t already know that.) I’m fanatical about keeping my appointments and activities logged on a calendar… it keeps me sane. And what a perfect Christmas gift, since just about everyone needs a fresh calendar every New Year! That’s why I’ve been busting my booty to complete the calendar in time for the upcoming Holiday Season. In my family alone, I can think of 10 people who could use a calendar for Christmas. Spoiler alert, Dad! Now you know at least one of your gifts this year.
But a calendar that doubles as recipe inspiration?? That’s just downright NEAT.
I had so much fun choosing these recipes and photographing them for this calendar. I know you’ll enjoy them! There’ll be soup in the winter, strawberries in the summer, and even potatoes for St. Patty’s in March!
There are a few recipes on the calendar you may have seen here on the blog before, but I’ve also made sure to include some never-before-posted recipes for an added bonus. What fun!

~
The calendars will be shipped in November so that you have plenty of time to wrap them if you’re buying them as gifts, but feel free to place your order starting today! The cost is $12.50 each + shipping. There are two ways to order the Pretty/Hungry 2014 recipe calendar. Just use either of the methods listed below:
1) Use this link and purchase your calendar(s) through Etsy!
*If you live locally (or anywhere we’ll cross paths before the holidays… Little Rock, Missouri, Memphis, Searcy, etc.) let me know! I can give you a coupon code for free shipping, and you can pick up your order in person and save on shipping!
OR
2) E-mail me your order at ccprettyhungry@gmail.com!
*Let me know how many calendars you need and I’ll send you mailing info for your payment. Easy-peasy! Same shipping rules apply for this option, meaning you can pay a few bucks for me to ship your order to you, OR you can plan to meet up with me sometime before Christmas and pay NO shipping.

I hope you enjoy this calendar and the recipes inside as much as I have enjoyed designing them for you! Each dish has my complete seal of approval and 100% guarantee of deliciousness. 🙂 Oh, and just for fun, here’s the letter that gets sent out with each calendar. Lots of Love!

.
.
.
Hello and Happy Holidays to you!
I’m Carissa Casey, author of the Pretty/Hungry Blog, and artful cooking is one of my greatest passions. I love the creative process of taking flavor, texture, color, and line and creating an edible masterpiece.
In a world of perfectly plastic fondant cakes and grocery store produce waxed to a sparkling sheen… we seem to have forgotten that we do not have to sacrifice the way our food tastes to achieve beautiful presentation. In fact, I believe we can make food that is not only elegant and tasty, but affordable and healthy too! I am on a mission to share that awesome news with the world.
Each of these recipes is crafted with love and designed to delight both your eyes and your taste buds! Nothing adds joy to a celebration quite like the food around which we gather. I hope that by bringing these recipes into your home this year and sharing them with the ones you love, you too will be filled with joy.
For full step-by-step tutorials of these recipes and many more, visit www.prettyhungrygirl.wordpress.com.
Happy Creating,
Carissa
.
.
.
What Drives Me Feeding Your Baby: Part 1


What Drives Me
It’s time for me to be transparent with you guys, lest you should mistakenly think that food and I have always been the best of pals.
Quite the contrary, there have been some dark days in my life when it comes to my relationship with food.
I started college as a happy 18-year-old and blissfully set about making new friends, spreading my wings, and oh yeah, gaining the fabled “freshman fifteen” like so many before me. I had already formed some bad eating habits in high school (like my regular practice of downing 4 bowls of Raisin Bran Crunch after an evening shift working at the Belgian Waffle & Pancake House… where, by the way, we were allowed to have as much free toast and as many free soft drinks as we wanted. You can imagine how great that was for my waistline!) Anyway, me and my complete lack of self-control thought the Harding cafeteria, with its unlimited supply of Count Chocula and Chocolate Milk, was pretty much the equivalent of Disneyland.
I developed a nice little moon face any 2-year-old would be proud of and went on my merry way. It wasn’t til the end of that school year that I started to feel a little uncomfortable, realizing that many of my favorite outfits didn’t fit me so well anymore. Sure, I’d noticed the progression and made minuscule efforts to correct the problem. But you can’t stop a freight train with a fly swatter. The real wake-up call came when Facebook hit the big-time (my freshman year!) and pictures of me started popping up more often than I was used to seeing them. I was officially NOT HAPPY with the girl looking back at me from those photos.
So the following year I got serious and decided to lose the weight, and BOY did I! I won’t go into the details of the rituals and rules I created for myself, but I’ll tell you that as I grew thinner and thinner, the lies in my head grew louder and stronger. Attention from others (especially about my physical appearance) began to mean more to me than it had in the past. Questions from concerned friends became a twisted sort of reward to my warped brain. My relationships with friends (and with the Lord) slowly dwindled into non-existence, since it was impossible to invest in them when I had so much meal-planning, calorie-counting, and exercising to do. (Besides, more often than not, they were getting together to eat and I didn’t want all the questions about why I wasn’t joining in! I was very secretive about the way I was restricting myself, wanting others to believe my trim figure came effortlessly. Oh, vanity is such a destroyer!)
You can imagine that very quickly my life began to feel like a prison. I had created a cage of rules and restrictions and forced myself to live within them. My desperate response to the caged feeling was to completely rebel against my diet rules and go in the opposite direction. I tried to keep this tendency in check (“just cheat once a month” or “on holidays” etc) but I was out of control. Addicted to the feeling of being thin and the perceived superiority it gave me, yet addicted to the “forbidden fruit” that was all food.
It was a combination of factors that led to the healing of my mind, and eventually the changes in my behavior. Seeing a counselor at my school, marrying my husband, and lots of unconditional love and earnest prayers from those dear to me. And though each of these things had remarkable effects on my damaged thought processes, it seemed the same food demons would rear their ugly heads every time life threw me a curve ball over the next few years. The struggle became especially intense again when I started teaching high school Spanish. I loved my students dearly, but felt an enormous amount of anxiety being up in front of a classroom every day. Along came food to be my comfort once again, though the ensuing guilt from over-doing it was ever present. This was not freedom. Yet. But thankfully, the truth had taken root in my heart. And it was slowly edging out the lies. And even on days where my behavior didn’t line up with my new convictions, I knew enough not to give up.
Why am I telling you all this? Because I feel like it explains why this little food blog has become such a passion of mine!
I stand here, in September of 2013, on the other side of that ferocious food battle. And I stand here, victorious. I stand here, free!
I’ve come to a point where I can joyfully say that food is no longer a source of struggle for me. No longer a source of anxiety. No longer a threat. No longer a security blanket. No longer a compulsion. No longer a cage.
Food today is a source of joy. A symbol of celebration. A gift I can give others. A reason for fellowship. An outlet for creativity. A blessing!
And what drives me to write this blog, to make appetizing photos, to share my recipes, and to reach new people… is the realization that after all those dark days, there is a place of delicious freedom. I truly believe you CAN “have it all” when it comes to food! You can make pretty food without it tasting bad. You can eat tasty food without it being expensive. You can eat sweets and not get fat. And I’m on a mission to share that AWESOME news with the world!
I’m certain I’m not the only one who has experienced this struggle. And I hope that if you are reading this post today from a place of hurt, frustration, or failure… you will use these words as gentle encouragement directed right at you. Where you are right now is not where you will be forever. Overcoming a difficult demon is never without its share of work, time, and toil… but you are well-equipped by the One who made you to live this life and live it abundantly.
I’d love to hear from you if you have a comment or a similar experience to share! Uplifting words for the battle-weary who might be reading are also welcome in the comments section. Join my mission and help me take food back out of the camp of the Enemy, and return it to the way God intended it. As a gift for celebration, creativity, and fellowship.
Lots of Love,
Carissa
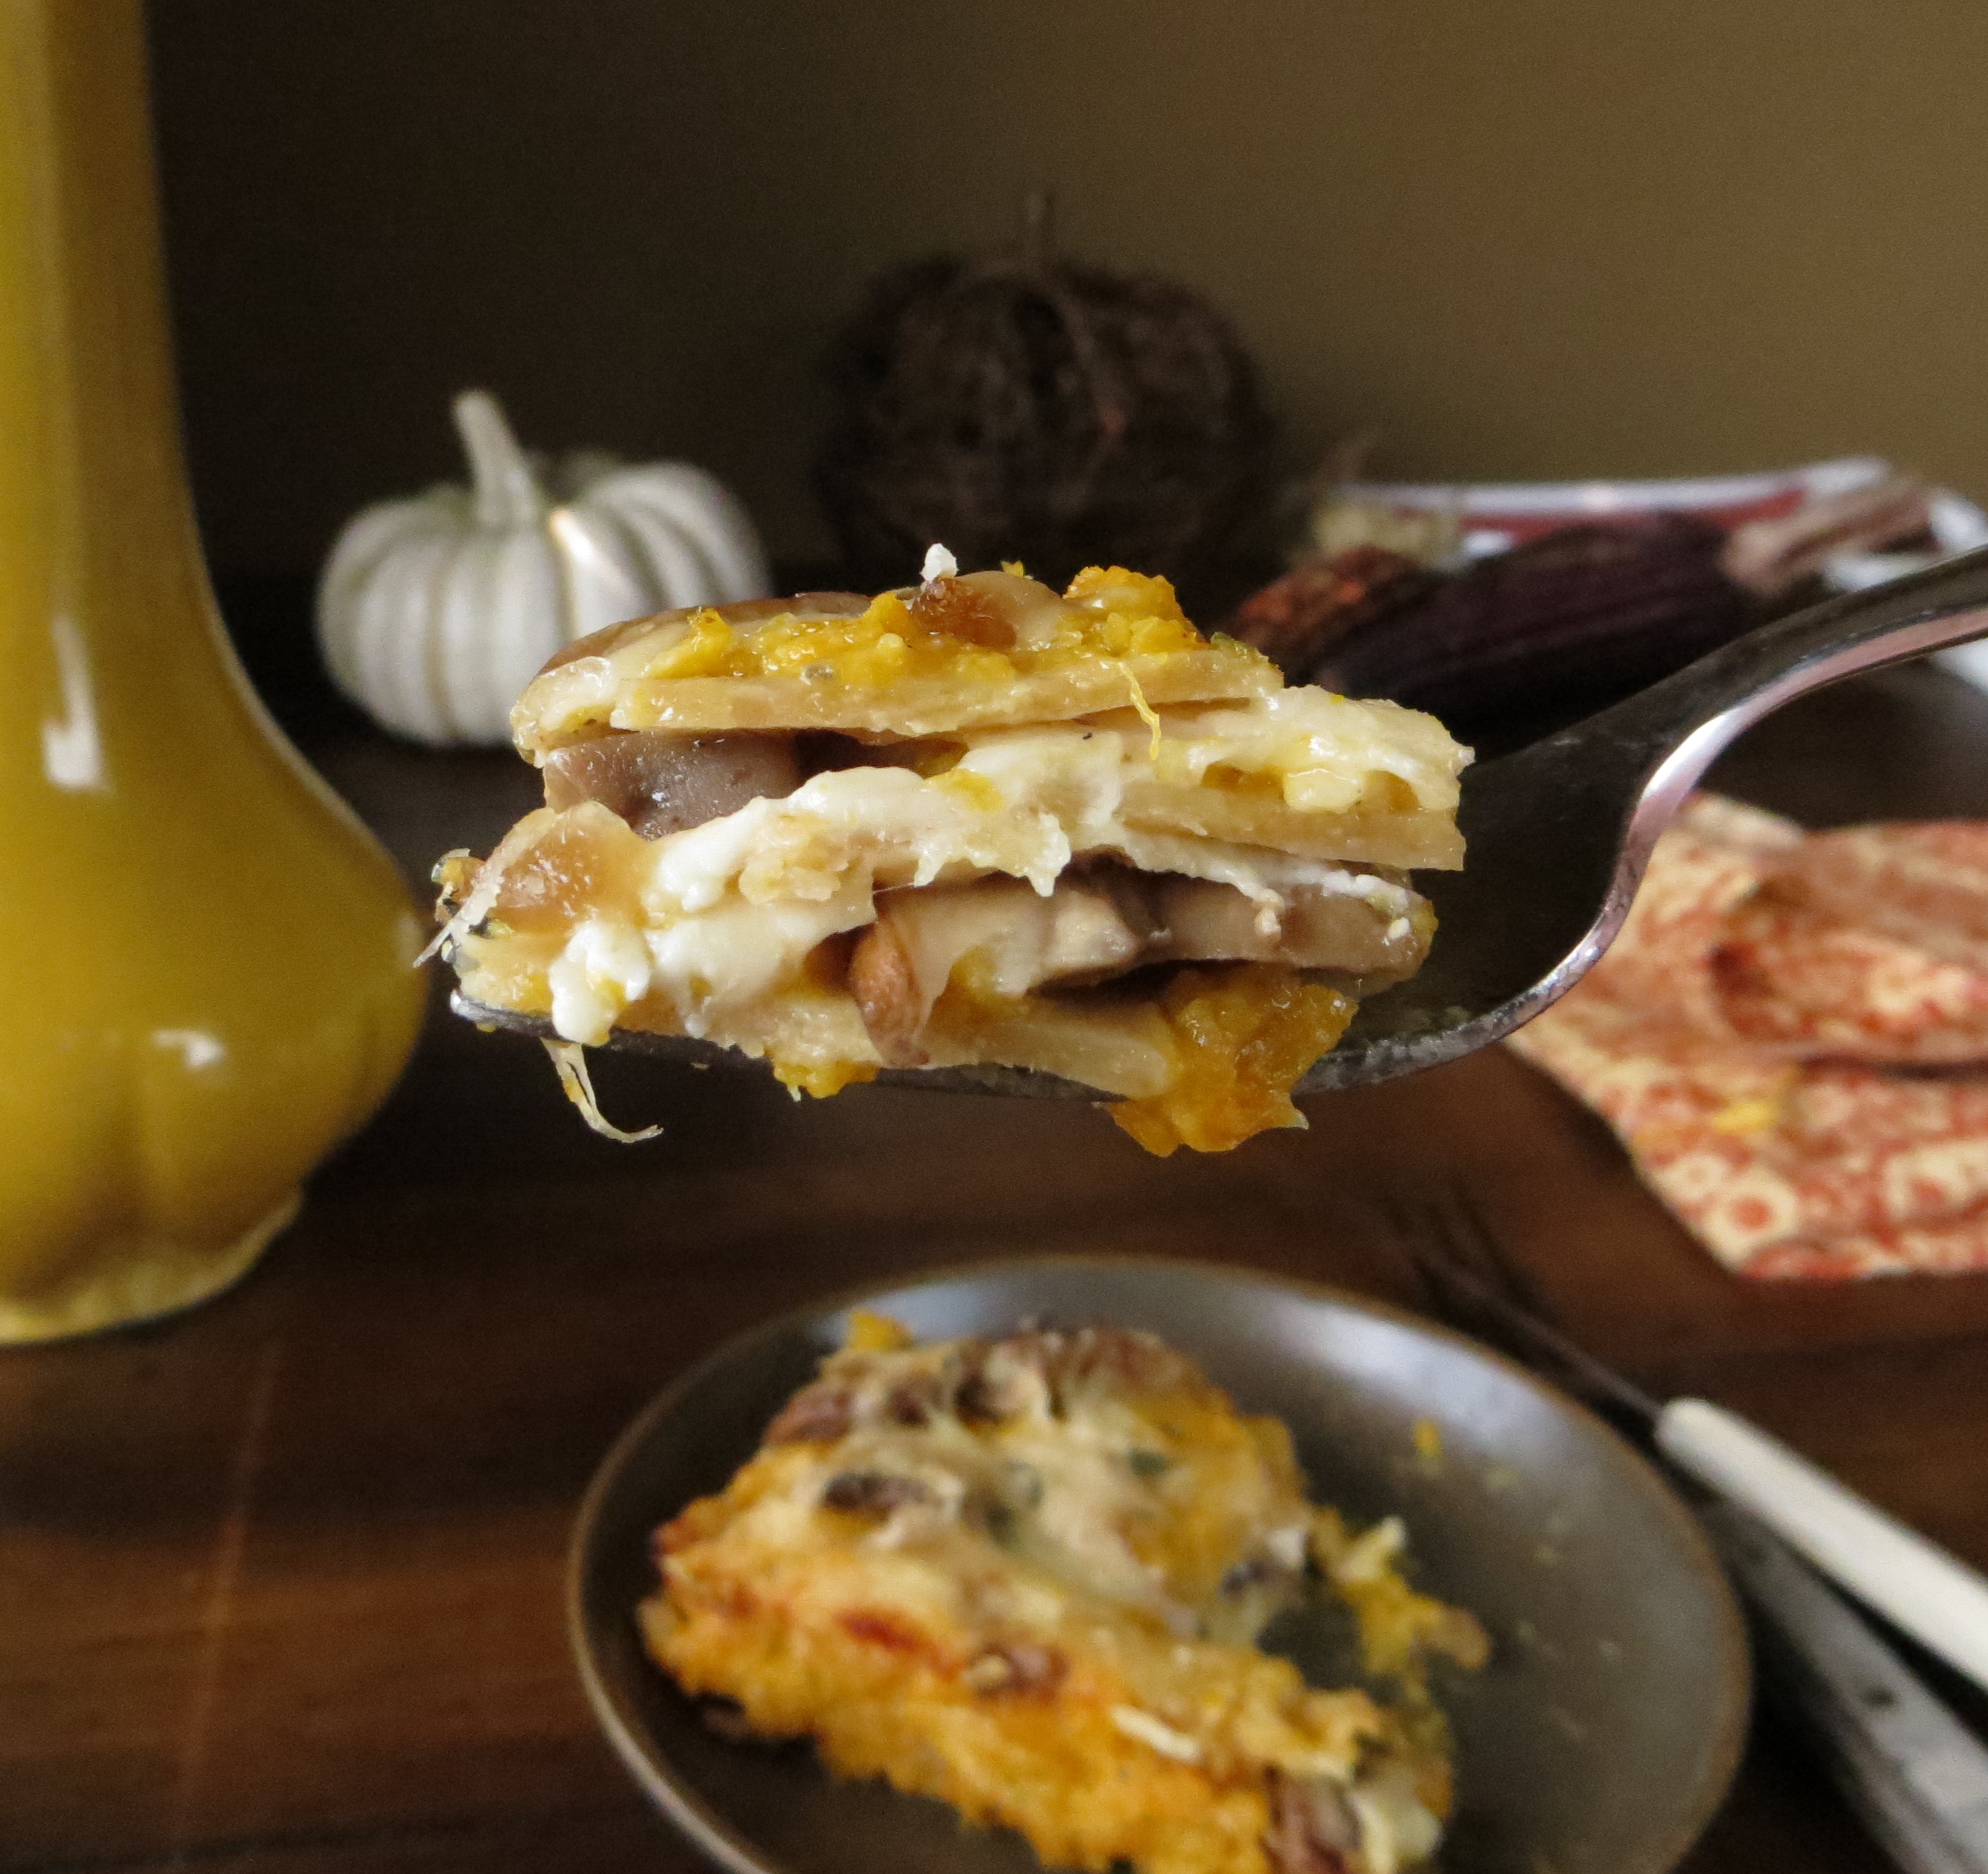
Pumpkin Lasagna
Call me a pessimist… call me a stick-in-the-mud… call me “not one of the cool kids.” I can take it! And I probably deserve it for what I’m about to say.
I’m already tired of all the pumpkin hype.
I realize it’s only mid-September, but already my Pinterest feed has blown up with pumpkin! Pumpkin bread, pumpkin cookies, pumpkin face masks, pumpkin coffee creamer… Don’t get me wrong, I reeeeally like pumpkin. But in my coffee? No thanks. In my chocolate chip cookies? I’ll pass.
I love dishes that feature pumpkin and bring out its delicate nutty sweetness. But gosh dernit, if a food ain’t broke, don’t try and fix it by adding pumpkin!
I’ll end my rant with a simple plea… don’t be a pumpkin pimp this Holiday season. Use it judiciously and thoughtfully where it makes sense. 🙂
Here’s a great example! This lasagna is surprisingly delightful. And finally a dish where pumpkin plays a starring savory role instead of sweet!

Paired with thyme, sage, and nutty melted Swiss cheese… this is such a cozy dish for Fall. And as a nice bonus, it is meatless! I have a number of vegetarian (AND meat-eating) friends who I know will LOVE this dish. And though I’m not a vegetarian myself, I gobbled it up with gusto. (To be honest, I literally licked my plate clean so that none of that amazing pumpkin cream sauce would go to waste.)
~
Bella mushrooms add a nice heartiness to this dish to make it filling and packed with protein. I truly hope you give in to your adventurous side and try it soon. 🙂
Oh, and real quick… have you ever tried making your own pumpkin puree? I realize that making ingredients is another class of cooking entirely and not everyone is up for it. But if you think you might be, I highly recommend it (if only to avoid throwing away all those pumpkins you buy for your porch!) You do need a large and very sharp knife, but it is well worthwhile to use your Fall pumpkins to make a bunch of pumpkin puree and freeze it. I’m always astonished by the price of canned pumpkin. (And NOT in a good way.)
Of course, canned pumpkin puree will work just fine for this lasagna. Here’s the recipe:
 Pumpkin Lasagna
Serves: 6-8
Ingredients:
.
.
½ lb baby bella mushrooms, cleaned and sliced
1 small onion, chopped
½ tsp. garlic powder
1 tsp salt, divided
1 Tbsp. olive oil
1 can (15 oz.) pumpkin puree (NOT pumpkin pie filling)
½ C. half-and-half
½ tsp. dried sage
½ tsp. thyme
¼ tsp. pepper
Lasagna noodles (enough to fill your pan in three layers, boiled til “half-done”, or alternatively you can purchase “No-boil” noodles)
1 ½ C. ricotta cheese
1 ½ C. grated Swiss cheese
1 C. grated Parmesan cheese
Directions:
In a small skillet, saute the mushrooms, onion , & 1/2 teaspoon salt in the olive oil until tender. Add in the garlic powder during the last minute of cooking. Set aside.
In a small bowl, combine the pumpkin puree, half-and-half, sage, thyme, pepper and remaining salt.
Preheat the oven to 375, and spray an 11”x7” glass baking dish with cooking spray. Spread 1/2 Cup of the pumpkin sauce in the dish. Top with enough noodles to cover the pan. Spread 1/2 cup pumpkin sauce to edges of noodles. Top with 1/3 of mushroom mixture, 1/3 of the ricotta, 1/3 of the Swiss, and 1/3 of the Parmesan. Repeat layers two more times beginning with noodles. Sprinkle a few thyme leaves over the top layer of cheese.
Cover and bake for 35-40 minutes, uncovering during the last 10 minutes of baking. Let stand for 10 minutes before cutting.
.
.
.
You might also enjoy…
Roasted Tomato Soup Red Pepper Cornmeal Souffle


